
Install WordPress on your Hosting using Cpanel
|
This article is sponsored by: | No1Freelancer | Happy Wheels | Silver Service Melbourne | |
So you have downloaded WordPress latest version on your computer from WordPress.org website and now ready to install at your hosting account. Let’s get started with uploading WordPress zip file on your hosting. There are two steps in installing WordPress. So let’s learn and install WordPress.
Step #1: Upload WordPress to your Hosting account
- Log into your hosting account and click “File Manager“
- Go to the root folder name “public_html“.
- See the top menu and click “Upload” button.
- On the upload screen, browse your computer to search WordPress zip file.
- Double click WordPress zip file and start uploading.
- Once the upload process is completed, click go back button to go public_html folder.
- Right Click the uploaded WordPress zip file and select “Extract” from the list OR click “Extract” from the top menu. This will show you a folder name “wordpress“. Double click this folder and you will see all the extracted WordPress files.
- Go to top menu and click “Select All”.
- Once all the files selected, click “Move” from the top menu. A dialogue box will appear with the move path. example public_html/wordpress
- Just remove “/wordpress” and click move. Now click “up one level” to go to the root folder
“public_html”. All WordPress files should be there.
Step #2: Create a Database and Database user with full privileges from “MySql Database”.
- Go to your hosting “Home” Page.
- Find the “MySql Database” icon from “Databases” section. open it
- You will see “Create new database” field. Type your database name here. (Note: Keep the database name simple like you can use your domain name initials). Click “Create database“.
- Once a database is created, Go to the “Database user” section to add ‘New user“
- type 8 characters “MySql user name” and password. Click “Create user” button.
- After creating the user, Go to “Add user to database” section.
- Select user name and database name from the drop down list.
- Click “Add” button.
- On the next screen, click the checkbox “All privileges“.
- Click “Make changes” button and you are done.
Run WordPress Installation:
- Go to your browser and type your domain name URL and enter. eg. http://yourdomainname.com
- You will see WordPress Language screen. Select your preferred language and click “Continue” button. Click “Let’s Go” button on the next screen.
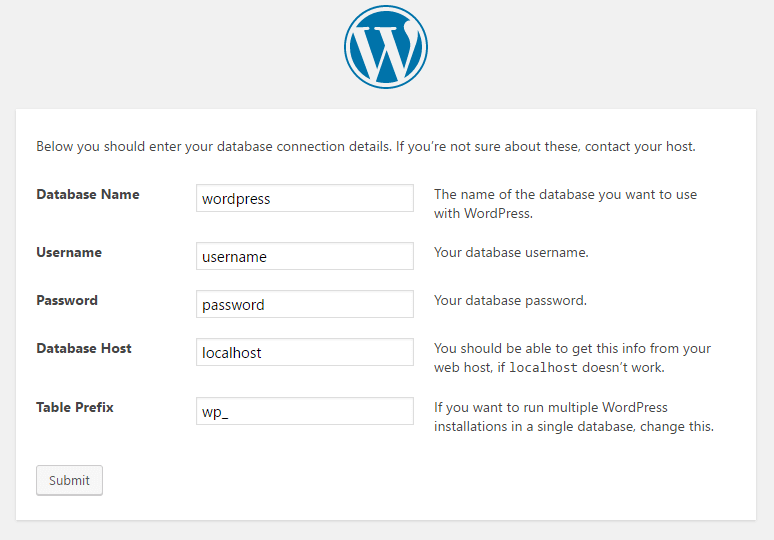
- Enter the database name in the database name field, User name in database user name field, Enter Password. Leave as is “localhost” in Local host field and wp_ in table prefix field.
- Click “Next” button. If all the information is correct, then you will see the next screen with “Run the Install” button otherwise “error establishing a database connection” message.
- On the next screen Enter “Site title” eg. “Your Website Title here”. Enter Admin user name for dashboard and Enter password. In the email field, type your email id.
- Keep the checkbox selected for “Allow search engine to index this site“.
- Click “Install WordPress” button. This will install WordPress on your hosting.
Congratulations! You have successfully installed WordPress and now ready to use your blog. Go to your browser and type your website name. You will see the default WordPress twenty seventeen theme home page with a welcome message.
So this is how you install WordPress on your hosting account. However if you don’t have hosting account or you want to install WordPress on your local Computer instead of hosting, then click the link below to learn how to install WordPress on a local Computer using XAMPP server.
|
Thanks to our sponsors | No1Freelancer | Happy Wheels | Silver Service Melbourne | |